
Hangi
- (Earth Oven)
The hangi or earth oven is
the best known traditional form of cooking for Maori.
As the smell of cooked food permeates the air, it is time
to think about the happy blending of the traditional style
of Maori Cooking with the additions provided by today's
society and surroundings.
Method
1. SITE: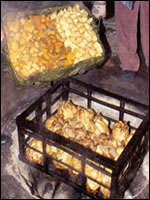
The selection of the site will depend on -
a) Access to water for soaking bags and cloths to create
steam.
b) Tillage of soil for ease of digging the pit.
Arrange to dig your hole in a piece of land that can be
utilised in another way when you have finished
making your hangi. Ashes make good compost.
For example a piece of land near the vegetable garden is
always a good choice.
If the hole is to be dug in the lawn remove the top layer
of grass and put it back afterwards.
c) Wind direction which could blow over the stack or endanger
buildings. Keep a watchful eye on your fire
and make sure it is well away from buildings, trees or anything
that which may catch a flying spark.
Make sure it is at least 3 metres away from the nearest
object and nowhere near any overhead
obstructions.
2. MATERIALS :
All varieties of meat, poultry, vegetables and steamed puddings
can be cooked in the hangi.
The preparation of the food is the same as preparing food
to be cooked on an electric stove.
The food should be prepared and put in containers that should
be placed within easy reach of the hangi.
Beef, lamb, pork, poultry, potatoes, kumara, pumpkin, can
all be cooked in the hangi.
Green vegetables are better cooked in conventional ways.
3. Gear Check List : Stones
When heated the stones will supply the heat for cooking
the food, so it is important to choose
stones that do not crumble in the heating or shatter too
readily.
The best stones to use are those that have been tried by
the local people.
Igneous (volcanic) are better than metamorphic or sedimentary
(e.g. sandstone) rocks.
There are several types of rock suitable:
Auckland Blue - this is a type of hard, brittle, blue- metal
rock and black rock.
Riverhead Rock - round loaf sized stones are best.
Volcanic Rock - this is the type of rock used during the
depression to make stone walls.
It is good rock to use, heats quickly, doesn't throw out
chips and is light to handle.
Choosing the rock takes some skill. Take a hammer with you
and hit each rock, only those with a high
pitched ringing noise are suitable . Kawakawa Bay and Dargaville
are both sites nearest to Auckland.
(some people today use fire bricks mixed with some of the
stones mentioned above.)
The number of stones necessary will depend on the type of
stone and size.
For up to a party of 25 persons, you will need sufficient
to fill a hole approximately 0.5 metres deep.
Tapering from approximately 1 metre in diameter at the bottom
(see below "making the hole").
The stones must be thoroughly dried out before use.
3. Gear Check List
:Timber
A mixture of dry timber and slow burning logs is best for
a hangi.
Hardwood timber is best for the fire because it gives out
more heat.
A good choice is lighter timber underneath and hardwood
on top.
You need about 45 pieces of wood about 1 metre long and
5 to 8 cm's wide.
4. Newspaper and Kindling
:
5. Food Baskets:
Depending on what you serve and how many people you want
to feed.
You will need about 3 food baskets or steamer type containers.
One for the meat, poultry and vegetables.
You can make the baskets from small mesh chicken netting
by cutting a square and folding the corners up.
Remember to allow for good sides when you are working out
the size of the baskets.
Good size baskets are one 25 - 30 cm's square and two smaller
ones 15 - 20 cm's square.
(alternatively, steamer type containers can be used).
Local variations can range from elaborately welded perforated
steel containers to bakers wire welded trays.
6. Preparation:
Hangi, takes a long time to prepare, so do everything possible,
the day before.
Make the baskets.
Cut the wood.
Dig the hole. (cover if left overnight)
The size of the hole depends on the size of the food basket(s).
Place wood and stones by the hole, make sure they are covered
if left over night.
Prepare the meat and vegetables.
If the food is to be prepared from a kitchen, have the meat,
poultry and vegetables ready to be placed in the
baskets.
For special type food wrap in muslin cloth. (stuffing, steam
puddings)
7. Covering:
Two types of covering are needed - mutton cloth and sacking.
Mutton cloth is used to the cover the food and the sides
of the baskets before they are put in the hole.
A much heavier covering is needed to keep the soil from
getting into the food once the food has been put
on the heated rocks.
You will need four to five pieces of sacking for this. One
to lay over the food, three down the sides of the basket
and one for each end of the holes.
8. Other Gear:
Long handled shovel, rake, hose.
9. Outset:
When all the preparation is done place the basket(s) on
the ground and mark out the ground around the
basket.
Leave at least 4 inches of clearance around the outside
edges of the basket(s).
Soak the sacks and white cloth in a bucket of cold water.
Crumple sheets of newspaper one at a time and put them in
the hole, save one double piece and roll it up like
a wick.
Put it in the hole near one edge (you will need this to
light the paper after you have put in the the wood and rocks).
Put the kindling in, then start building a pyre by putting
the bigger wood on.
After the wood reaches ground level, it must be placed in
a special way.
The pyre should be built over the pit by placing alternate
layers of wood at right angles to the layer below it.
Lay the pieces of wood side by side across the top of the
hole, leaving a half inch gap between each
piece until the hole is covered.
On top of this layer put another row, laying it in the opposite
direction. As the pyre is being erected, the
stones should be placed in three or four layers at regular
intervals throughout it in a pyramid shape.
Build the fire very solidly.
It has to burn for at least an hour or so without being
replenished and must have plenty of body.
Light the newspaper wick. Keep a constant eye on your fire.
The rocks will begin to change colour when they are hot.
(the volcanic rock will go white)
Before long the wood will burn down and the heated rocks
fall into the hole. As the pyre burns down,
replenish it after the first hour with more wood and return
any displaced stones to it. (don't forget the fire should
burn for two to three hours)
Now is the time to fill the food baskets.
Place the baskets on a bench, arrange the seasoned meat
on the bottom carefully, place poultry on top of
meat, place a smaller basket on top of bottom basket and
put potato and kumara (sweet potato) inside,
place pumpkin and specialty food on top and cover with cabbage
or watercress. Sprinkle salt over the food and cover with
the white cotton cloth. Put the food baskets near the hole.
Now check that the wet sacking is near the hole.
After 11/2 to 21/2 hours the pit should be covered in ashes
and stones as the fire has burnt through.
At this stage clean the pit.
If the pit is not cleaned properly, the ash will spread
through the hangi when the water is applied to create
steam.
Some people like the smokey taste of meat cooked with the
embers left in the hole.
Remove all the unburn't pieces of wood, raking the hot rocks
to one side of the hangi hole with a
long handled shovel.
Make a flat bed out of the rocks and throw about two handfuls
of cold water on the rocks.
The jet of steam will carry the ash away. The stones should
be left laying on the embers.
Place the baskets of food onto the hot rocks. Throw several
quarts of water over the food and stones to produce clouds
of steam.
MOVE FAST.
Make sure the the white cotton covering the food is wet.
Over the steam and food, place layers of wet mutton cloth
or an old table cloth to keep the steam in.
It is essential to start from the base of the food pile
and spread the cloth to ensure the soil does not come
into contact with the food. The cloth must cover all the
food in the hangi. A layer of wet sacks are used to cover
the cloth.
Again the sacks should be thoroughly soaked and again the
covering should begin at the bottom of the
food pile, the sacks being put over, one piece each end
and one in the centre, in that order.
Through out the covering process, water should be sprinkled
to create steam.
MOVE FAST.
The sacks must not have contained chemicals.
The soil is then spread over the sacks forming a dome shaped
mound.
Begin, again from the bottom and build towards the top.
Watch for any steam escaping and cover the cracks with soil.
The hangi will need to be checked at regular intervals just
incase steam escapes from the soil.
The success of the hangi depends upon the speed in which
the steps can be carried out.
It should take about 15 - 20 minutes and then you can take
a well deserved liquid refreshment.
This is a good time to make a green salad, gravy and prepare
to boil green veges, e.g peas.
Leave the hangi for 2- 3 hours before digging it out to
serve.
Peel the soil off the hangi from the top to the bottom and
do like wise with the sacks and cloths.
All eyes peer hungrily at the food as the smell of cooked
food rises in the evening air.
Is it cooked?.
It is.
It can rarely be overcooked.
Let the hangi begin.
10. Service::
Slice meat and portion chicken have the green vegetables
hot and ready to serve.
Place onto plates and serve.
SUCCESS or FAILURE.
If steam emerges from the hangi after the first spitful
of soil is removed, the hangi will be successful.
If no steam appears, cover it up and buy fish and chips.
Alternative Method
1. Oven Hangi:
Prepare this meal in a roasting dish which must have a fitting
lid.
Heat the oven to a moderate heat, approx 220 degrees Celsius.
Into the dish sprinkle some parsley and a few pieces of
diced celery.
Lay in a few pork bones and on these place 4 pork chops.
(chicken can be added or used in place of pork bones).
Place on top of bones, 4 potatoes, 4 trimmed kumara.
Lay cabbage over the bones.
Place enough cabbage for 4 and if possible some watercress.
Add 1 and a half cups of water.
No salt is needed.
Cover the dish with tin foil.
Place lid on top and bake for 3 and a half hours.
Serves four.
Developed by Charles Royal
